
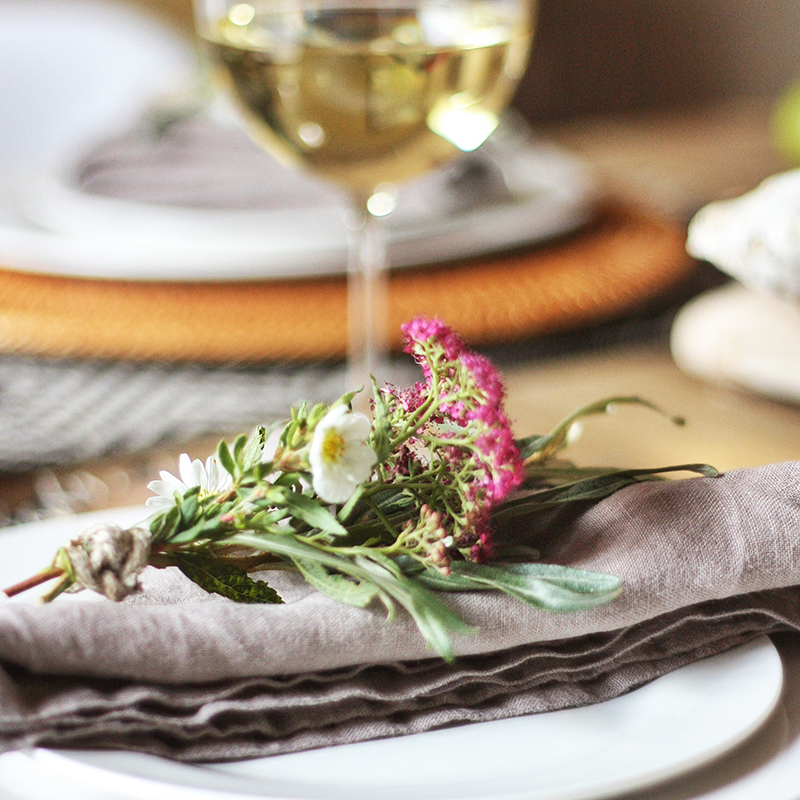
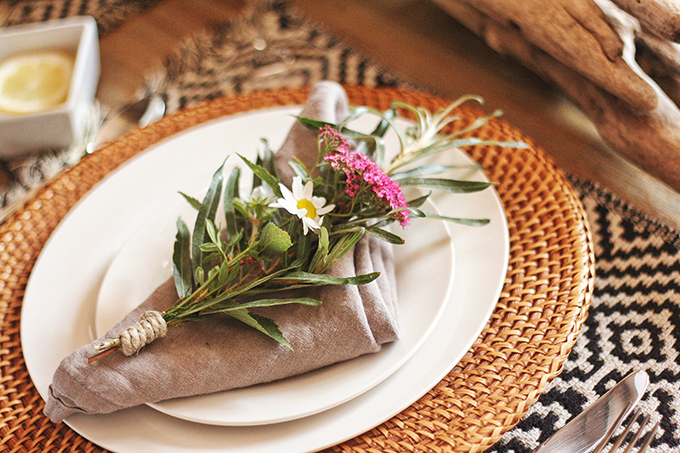
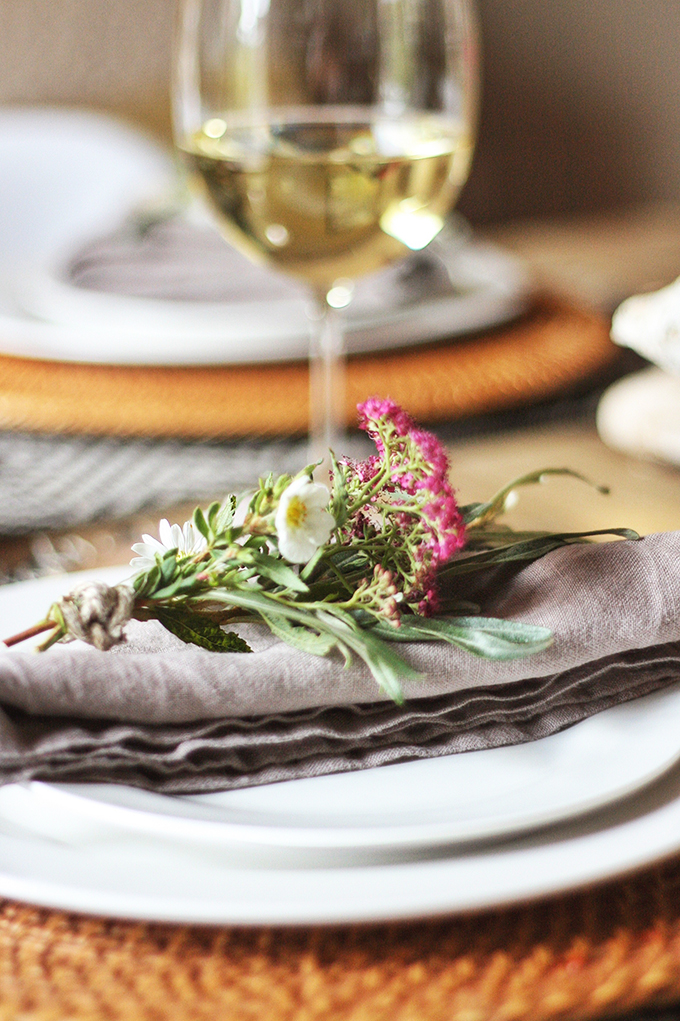
Today I’m showing you how I made these little Wildflower Bundles for a summer dinner party! I was inspired by these Wildflower Bundles from Free People, and thought they would make a cute idea for a summer tablescape, on top of the napkins at each place setting. It’s such a simple but special touch, and guests like to take them home and dry them. You can make these with whatever wildflowers and shrubs you have in your own yard, all you need is some scissors and twine.

What you’ll need
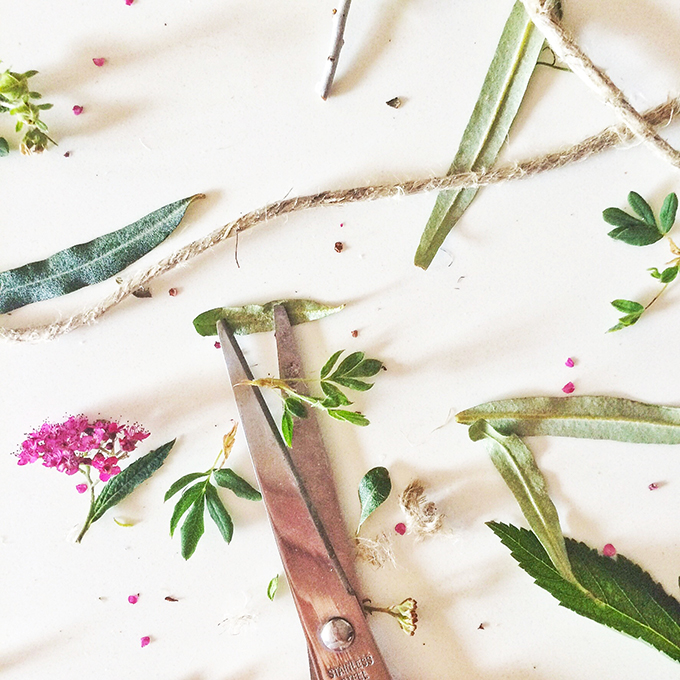
• Greenery and shrubs from your yard (1 piece of each different shrub for each bundle)
• Flowers (I like to use at least 2 different flowers for each bundle)
• Twine (I purchased mine at Michaels, but you can also find it for much less at dollar stores)
• Scissors
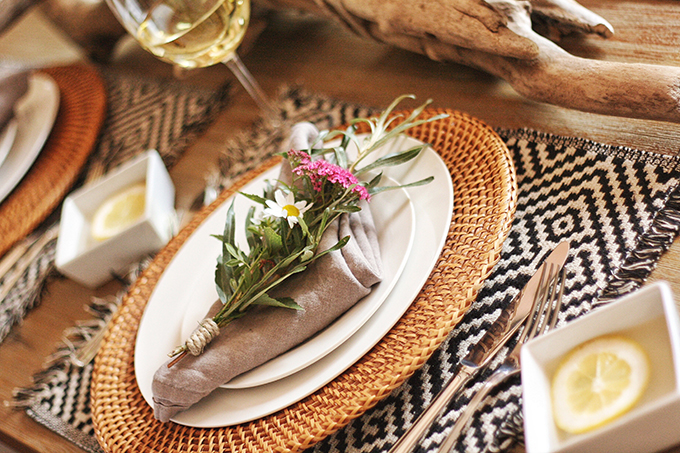
WILDFLOWER BUNDLES
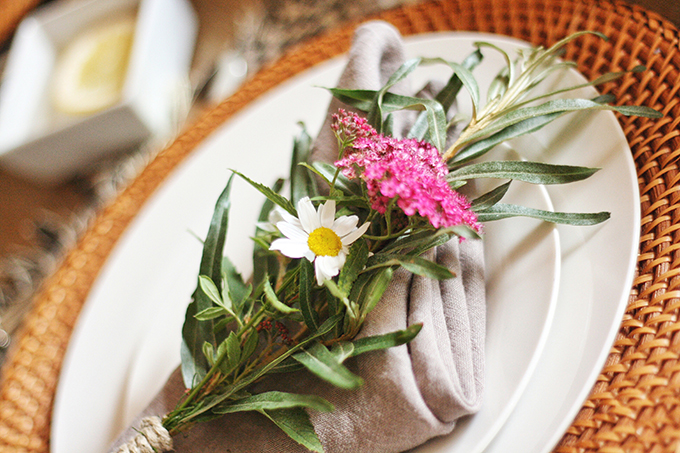
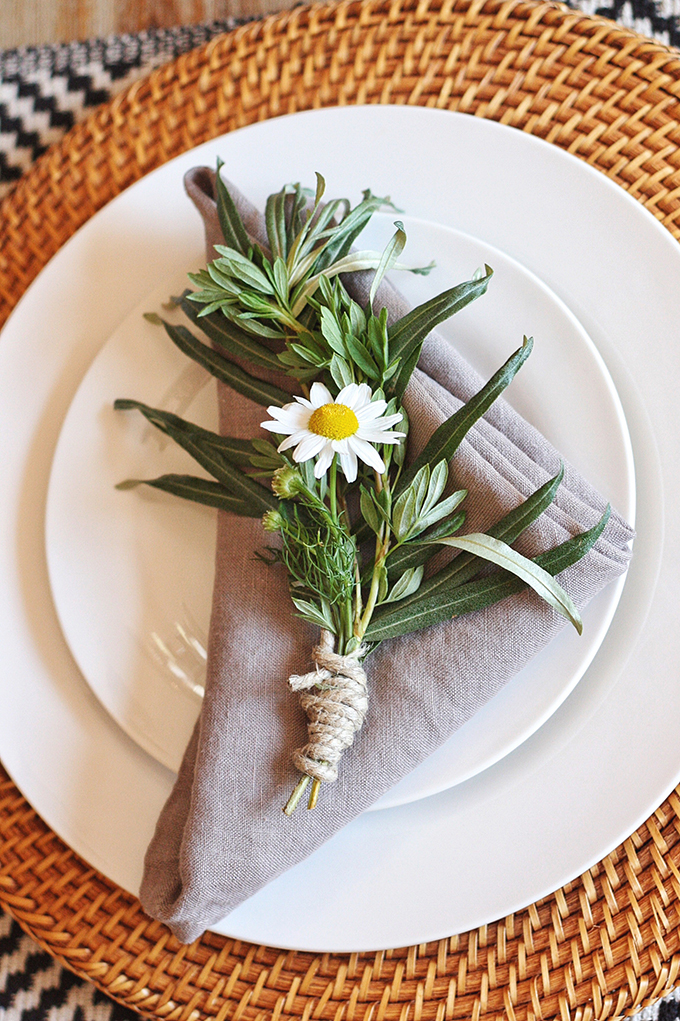
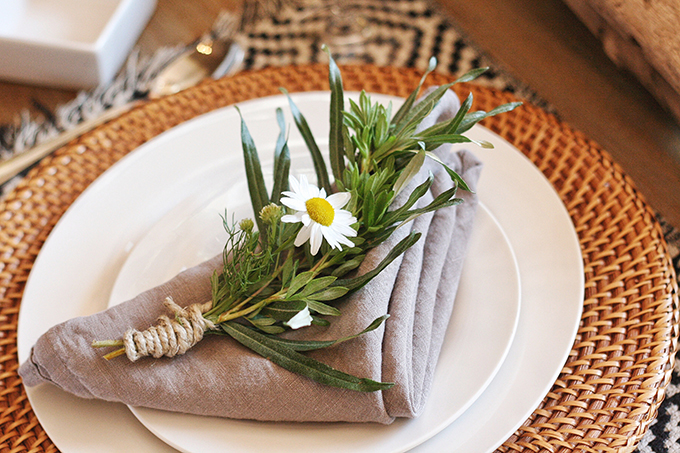
In any season, I love to bring elements of the outdoors inside. This summer, I’ve been all about adding fresh flowers, wildflowers, and shrubs and greenery to my space. For my Wildflower Bundles, I wanted lots of greenery to bring life into an otherwise neutral tablescape. The little daisies are so cute and scream summertime (plus the white and yellow coordinate with other elements of my decor), and I added a pop of fuchsia to bring a bit of contrast and visual interest to the bundle. Since fuchsia and yellow / green are complimentary colours (art school coming out here!) they enhance each other and really pop.
1) Cut your longest and most leafy piece of greenery to the size you want your bundle. For my bundles, I used a shrub with a long, thin leaves (but a wide leaf span) for my base shrub.
2) Layer a second piece of greenery over top, cutting it about half an inch shorter than your first piece. My second piece of greenery wasn’t as wide, and added a lot of extra leafy texture.
3) Layer your largest flower, berry or colourful element on top, cutting the stem 1 – 2 inches shorter than your longer piece of greenery.
4) Layer your smallest flower or colourful element on top, cutting it 3 inches shorter than than your longer piece of greenery.
5) Once you’re happy with the shape and they way the flowers and greenery fit together, start wrapping twine around the base of the bundle. Tie the twine in a knot at the back or side of the bundle, and trim. These don’t have to be perfect, that’s part of their charm.
Note: This is just a guideline! Feel free to experiment and have fun with layering different colours and textures. If guests want to dry the bundles, it works best if they give them a spritz of hairspray while they’re still fresh, then hang them upside-down to dry.
I also tried some with extra greenery and without the fuchsia flowers — these are so bright and fresh!

What I love about these Wildflower Bundles is that they totally change with the seasons the location! In the summer, lots of flowers and herbs are in bloom, and all are fair game. If you grow your herbs like basil or lavender, they would be beautiful in these bundles. Try experimenting with layering and adding different textures — you really can’t mess these up, and you can get as creative as you want! If you live near the mountains, try adding some berries. Live in the country? Incorporate some wheat or canola! In the fall, you could incorporate changing leaves and twigs. The possibilities are endless!
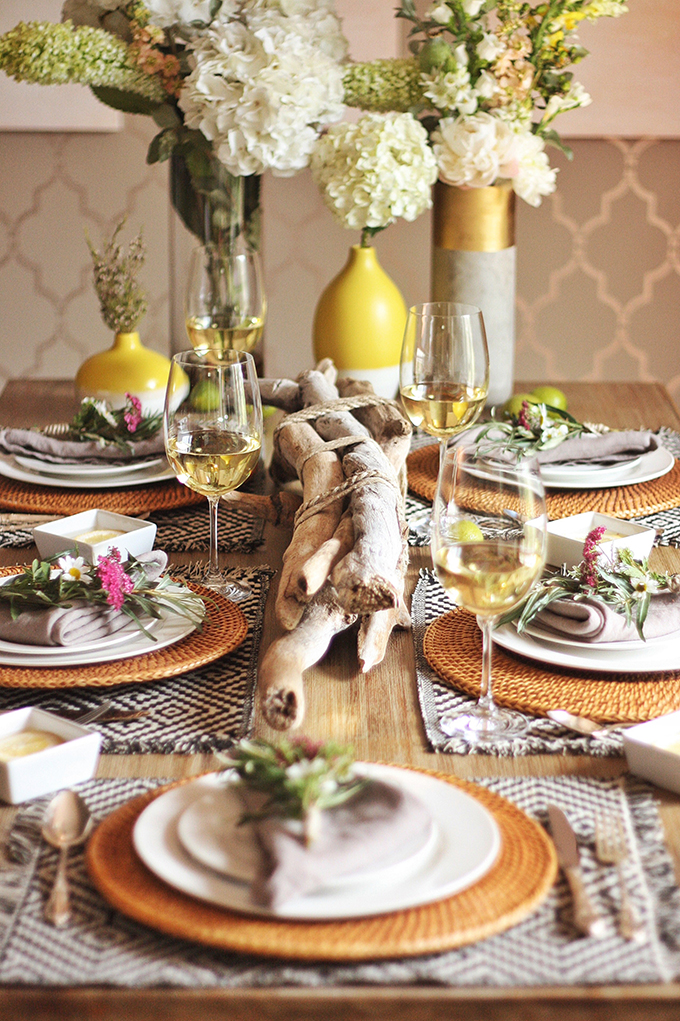
For full details on my centerpiece, and shoppable links to pieces I’ve used to style my tablescape, head over to my Driftwood Sculpture Centerpiece post. If you’re interested in my wall paint and stencil, check out my Wine Nook post.
I hope I’ve inspired you to look around and see what elements of nature you can bring inside to add a special touch to your next dinner party! If you guys make a Wildflower Bundle, tag me in your photos on social media, or leave a comment for me below. I’d love to see what you come up with! Have a great weekend!
Disclaimer: This post is not sponsored, and contains my genuine thoughts and recommendations. JustineCelina uses affiliate and referral links, which allow me to receive a small commission when you make a purchase through one of my links. Your purchases help to support JustineCelina.com!
15 Comments
[…] For this dinner party, I made little wildflower bouquets for my guests. It’s such a simple but special gesture, and guest like to take them home and dry them. I have an in-depth post about how I made them! […]
[…] This year, I knew I wanted to create a fun wine charm DIY, and I remembered how cute and easy my DIY Wildflower Bundles were to make, so the idea for my DIY Mistletoe-Inspired Wine Charms was […]
[…] Wildflower Bundles […]
How gorgeous! I love how far a simple addition to table décor can go! Now if only the flowers and greenery would bloom here in Winnipeg I could attempt to throw these together, too!
Hey Amanda! We’re having the opposite issue in Calgary this year and everything is blooming way ahead of schedule. Our lilacs are almost gone! If you do recreate them I’d love it if you tag me on social media or send a photo. Cheers, lady!
These are so pretty! What a great idea!
Thanks so much Cathy! I’m glad you enjoyed the post. 🙂
wild flowers are my favourite- and I love your entire table setting! Love the bundled brush center-piece as well. Great work!
Thanks so much, Hilary! I actually have a post about how I made that DIY Driftwood Sculpture Centrepiece if you’re interested. 😉
These are so beautiful! I think it’d be super fun to do an edible bundle that would complement the dinner, too. Thanks for another fabulous idea, Justine! Your whole table setting in these pictures is perfect.
Now THAT is a fantastic idea! I actually have some edible flower content planned for later this spring and summer that I’ll be working with my friend Rebecca on. Thanks for stopping by Alexandra and have a fantastic weekend!
These are so beautiful! I love how you can totally change them depending on the season. (And I love Alexandra’s idea of making edible ones! On top of a cake or something? Yum!)
Thank you, Cristina! I’d never really thought to change them up seasonally, but that’s is a great idea too! I created some DIY Mistletoe-Inspired Wine Charms around the holidays last year that are a similar concept, if you’re interested! 🙂
For some reason, I had it in my mind that these were all EDIBLE bundles… not really sure where I got that idea. I was scrolling along and thinking “these are so gorgeous, but man, that looks chewy…” Fortunately I’ve straightened things out.
Beautiful work Justine. I love everything about these – and I’d HAPPILY put them on my table… even if I can’t eat them. (And when you do get to those edible bundles – well, I’ll be even happier).
Haha, your comment is cracking me up Sean! Thanks for stopping by and for the comic relief. 😉 I do have some edible flower content planned. Stay tuned!